Maintenance and Welding Metallurgy
Industrial Maintenance Welding Metallurgy PDF
By Mike Sondalini

This Industrial Maintenance Welding Metallurgy Whitepaper PDF is essential for those in industrial maintenance who will be doing welding projects as well as vocational school students learning to weld. Anyone working on all metal fabrication projects needs to read this whitepaper. As this whitepaper is focused on the metallurgy aspects, the metal corrosion basics covered here are essential. You don't want equipment operating stiffly due to metal corrosion. 27 pages.
Those in a company's central maintenance and welding department will find the section on making stairs, walkways, and platforms especially useful. Students planning on entering the industrial maintenance field will find the knowledge and advice given on preheating in welding useful. From a design perspective, the knowledge shared in the stress in metals and metal fatigue failure sections is essential. Important to those working with welding machines in a manufacturing environment, should be sure to read the section on non-destructive testing of welds.

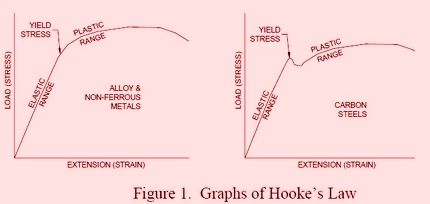
Figure 1 indicates that metals have an elastic region where load and strain are proportional (a straight line on a graph). In this region, the metal acts like a spring and when the load is removed, the deformation (strain) reduces and it returns to its original shape. If instead the load increases, the strain (deformation) rises until a point is reached where the metal can no longer sustain the load and it yields. The yielding can be gradual as in the left-hand plot of Figure 1 or it can be sudden as in the right-hand plot. The aim of much of the work in metallurgy is to discover how to extend the yield point further because in doing so we can fabricate items using thinner metals for less cost.
Industrial Maintenance Welding Metallurgy PDF - Contents:
Preheating in welding and when to apply it.
Weld preheating is the purposeful application of heat to warm metal to the desired temperature prior to welding. Preheating slows down the cooling rate of the weld and gives the metal more time to form a good microstructure, release internal stresses, and dissipate hydrogen from the weld.
Non-destructive testing of welds.
Welding processes and methods can introduce contaminants and metallurgical defects into the weld. If a weld is required to withstand severe loading conditions and stresses it is critical to ensure its quality meets minimum standards. Welds can be tested by destructive and non-destructive techniques. Most production is tested by the use of non-destructive methods. The most common non-destructive tests to check welds are Visual Inspection, Liquid Penetrant, Magnetic Particle, Eddy Current, Ultrasonic, Acoustic Emission, and Radiography.
Bronze - use the right one in the right place.
In this section, we will talk a little about bronzes, their properties, and their applications. Occasionally people refer to a brass bushing when in fact they want a bronze bushing. The first thing to realize is that there are wrought standards and cast standards. In the case of bronze, the continuous cast material has all of the advantages of the wrought products in other materials.
Welding Metallurgy - stress in metals.
Too much stress in metal will cause it to fail. Failure can occur by putting the metal under a once-only load greater than it can take or by metal fatigue from continually loading the metal cyclically with a high load less than the breaking load. Stress produces strain at the molecular level in the metal and discontinuities between atoms come together to form microscopic cracks. Under continued stress, the cracks grow, and eventually the metal parts.
Metal fatigue failure.
Metal fatigue is the common name used to describe the unexpected failure of metal parts by progressive fracturing while in service. This section is a basic introduction to the mechanism of metal fatigue failure. An introduction to accepted theories is provided and relevant design practices to reduce metal fatigue are presented and explained.
Metal corrosion basics.
The section explains the metal corrosion process including the basic chemistry of how metal loss occurs. Methods to control corrosion are also listed and explained. Metal corrosion is a chemical reaction between a metal surface and its environment. Corrosion can occur in a gaseous (dry) environment or a damp (wet) environment. It is the result of an electrical process in which electrons are exchanged between the corroding metal atoms and the acceptor element atoms. Corrosion control involves stopping or minimizing the loss of electrons between the components involved in the process.
Making stairs, walkways, and platforms.
Stairs, walkways, platforms, and ladders are required to be made to Standards. The standard specifies the design requirements and the materials of construction to be used. This section details the slope needed for accent, allowable loads, and limiting the maximum deflection along a span. It also covers the requirement for stairs, ladders, guard rails, and more.
Spread forces through equipment & reduce breakdowns.
When a force is applied to a structure it reacts by deforming slightly. The structure is placed in a state of strain. The strain produces internal stresses. If there is insufficient strength in the structure to take the stresses it will fail. Equipment failures involving sudden breakage of parts will most likely be traced back to overstressing of the part.
Rotating tire and trunnion wear may need a metallurgist.
Roll mills, drum dryers, kilns, ball mills, and rotating reactors usually turn on metal tires and trunnion rollers. Eventually, the tires and rollers wear thin or fatigue and require repair or replacement.
Reducing wear in abrasive conditions.
Abrasion is the removal of material from a surface by the movement of material across its surface. The factors affecting abrasive wear are the surface properties of the item being worn away, the abrasive properties of the material moving across the surface, and the characteristics of motion. Where abrasive wear is a problem it becomes necessary to understand the mechanism of attrition.
Rotating shafts under bending stress.
It is common to transmit motion using rotating shafts. The shafts are mounted in bearings and turned by force through a drive arrangement. The shafts usually also carry a load. These loads cause bending and the shaft reacts by producing counter stresses within itself. Provided the reactive stresses are within the shaft's strength range it will take the load. But if the stresses are greater than what the shaft can take it will bend. Even if the stresses are below the load limit but fluctuate, it is possible that the shaft will break from fatigue. The point of highest stress can be found by looking at the arrangement of the shaft supports and loads and calculating the forces and stresses.
Gain valuable insight and understanding; get your copy of Industrial Maintenance Welding Metallurgy PDF today!
![]() Download right away in a printable PDF format!
Download right away in a printable PDF format!
$12.50
An Excerpt From Industrial Maintenance Welding Metallurgy PDF
"Preheating in Welding"
The metal in all three dimensions around the weld puddle is raised to the predetermined temperature (up to 300°C (570°F) for steel) before welding and then allowed to cool off slowly once welded. Without adequate preheat, the cooling would be rapid, and intolerably high hardness and brittleness would occur in the weld and the heat-affected zone (HAZ) neighboring the weld.
Preheating procedure for welding can be done with gas torches or banks of torches, by electrical heating elements strapped to the item, in ovens or furnaces, with induction heating by an electric field, and by radiant heating from a short distance off the part. The metal is preheated to the same temperature in all three dimensions for a distance at least equal to its thickness and to a a minimum distance of 75mm all around the weld point.
Please contact us with any questions.
