HVAC Test - Journeyman practice exam test 4 of 4 Assessment
HVAC Test - Journeyman practice exam test 4 of 4 :
Online HVAC test and journeyman practice exam 4 of 4. 20 questions in this practice exam. Plus, advice on How to test an HVAC compressor in the details area.
Please consider our training while here ...

Study up with our Commercial & Industrial Refrigeration Training Course. A great start for HVAC Technicians.
HVAC Test - Journeyman practice exam test 4 of 4 test details:
( 20 Questions )
Online HVAC practice test with questions. 4 of 4 HVAC tests, with 87 questions total. 20 questions in this test.
If you found this test via a search, please see the advice below about How to test the HVAC compressors. This extra information may help get your thoughts on the job before taking the test above—just some basics.
How to test the HVAC Compressor
1. Check the Compressor Capacitor
2. If the AC Compressor is Noisy, Check ...
3. Is the Compressor Short Cycling?
4. Check the Compressor Windings
5. Compressor Short to Ground Check
Are there strange sounds or smells around your outside condenser? Do you see ice around the unit? Does the system operate at a higher frequency than regular operation, not cooling? If so, consider testing the HVAC compressor.
Check the Compressor Capacitor

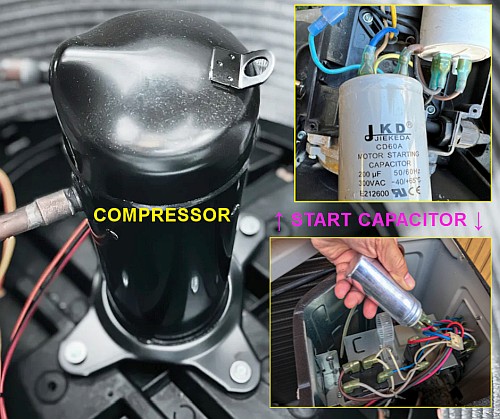
Check the compressor capacitor(s).
To test an HVAC compressor, first, you should check the compressor capacitor. Start by turning off the power to the unit and then discharge the capacitor. After that, you can use a multimeter to test the capacitance to see if it is within the recommended range. Before doing so, please see "How to Test HVAC Capacitors."
You must replace the capacitor if any capacitors have a reading out of range.
Check if the AC Compressor is Noisy
If the AC compressor is noisy, it may have mechanical issues. Possible causes include worn bearings, a loose mount, or internal damage. A banging sound could indicate this. A bad motor in the compressor could cause a loud screeching noise. More often than not, a screeching noise is condenser fan-related, not the compressor. A high-pitched whistle or hissing could mean a leak. It could also mean dangerously high refrigerant pressure. A rattling sound could be a worn-out compressor clutch or another failure.
It would be best if you inspected the compressor. Then, fix the exact cause.
Check if Compressor Short Cycling is Occurring
Compressor short cycling can have several causes. They are a low refrigerant charge, a faulty thermostat, a clogged air filter, or a mechanical failure. Short-cycling is when the compressor doesn't finish a cooling cycle. It runs for a few minutes, then shuts off.
Compressor short cycling on and off every 5 minutes often goes unnoticed. Meanwhile, it wastes energy and shortens the life of the HVAC unit. Keeping the condenser clean prevents potential problems from arising. Short cycling's concealed defect is a reason for routine maintenance. A best practice is to schedule heat pump maintenance in spring and fall. Examine standalone air conditioning units before the warm season begins. At least check the refrigerant and clean the condenser coil before each season.
Check the Compressor Windings
To check the compressor windings, use a multimeter. Measure the windings' resistance (ohms).
Preparation:
Power off, lock out, and let the compressor cool. Then, take a picture or note the wire colors and positions. Finally, unwire the compressor.

Residential HVAC uses a single-phase compressor; industrial uses a three-phase.
Testing Single Phase Compressor:
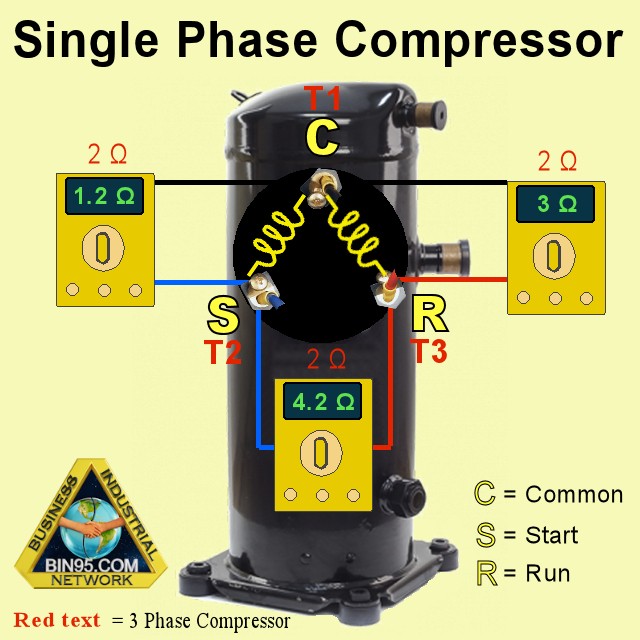
The resistance between the Run and Common terminals will be the lowest of the three measurements. You should see resistance between the Common and Start terminals. It should be at least double the resistance found when testing the Run terminal. The resistance between the Run and Start terminals should be the greatest of the three measurements. It should be the total resistance, Run + Start resistance combined.
You have an open winding if the meter reads 'OL' on any terminal measurements. Note that the thermal overload in series with the Common terminal could cause an OL reading on the meter. So, it is another good reason not to test a hot compressor. Avoid touching it to check one's heat level.
Testing Three-Phase Compressor:
The three-phase compressor is more common in industrial use, not in home air conditioners. This compressor type often has terminals labeled (C)T1, (S)T2, and (R)T3. Unlike a single-phase system, all three resistances should be about the same in a three-phase system. For example, 2 ohms resistance no matter which terminal the meter leads are on.
In the 3 phases, don't switch the wires. The compressor may run in reverse and get damaged. Check the readings against the manufacturer's specs to verify they are within the acceptable range.
Check for a Compressor Short to Ground
To identify a compressor short to ground:
- Use a multimeter.
- Check for continuity between the compressor terminals and the body (ground).
- Set your meter to its highest resistance, e.g., KΩ (1000s). You should see OL for each terminal to the ground.
Some compressor makers suggest you should see no less than 1000Ω per volt to ground. So, for a 120v compressor, you should see no less than 120kΩ from winding to ground. Because the refrigerant lowers the resistance, that should be a good rule for them. But, we prefer to see OL or over 100megΩ.
For predictive maintenance, using a Megohmmeter:
100 Megaohms or higher = GOOD
21-99 Megaohms = Schedule for repair.
20 Megaohms or less = BAD
If there is continuity, it indicates a short time to ground, and the compressor may need to be replaced.
Check the AC Compressor Relay

How to check compressor potential relay. (voltage relay, current relay)
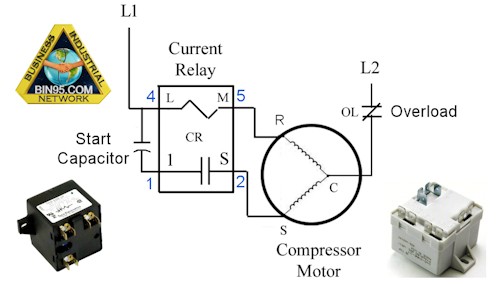
Above, we see potential relays, also known as voltage relays. Compressor motors use them to start single-phase, capacitor-start, and capacitor-run (CSR) compressor motors. When you include the capacitor, you refer to it as a hard start kit.
The above pictorial shows a three-spade potential relay on the left. Terminals 2 and 5 form the relay's coil. Terminals 2 and 1 consist of the normally closed (NC) contact.
The pictorial's right side displays a relay with four spades, a coil in positions 4 and 5, and a normally closed contact at points 1 and 2.
To check the AC compressor relay:
- Verify that the relay is being called to be on (engaged).
- Check for voltage at the relay's coil when the thermostat calls for air. In our pictorial, there would be 120V at pins 4 and 5 for the 4-terminal relay on the right. And at terminals 2 and 5 for the 3-terminal relay on the left.
- If you have voltage at the coil, the next step is to power it off and lock it out.
- Unwire the relay to take resistance checks.
- There should be around 10 kΩ of resistance between the coil terminals.
- Also, there should be zero (no more than 2Ω) resistance between the NC contact terminals.
Replace the relay if any measurement is out of range or open (OL) on the meter. Also, check for visible signs of heat on the relay housing.
Navigate below to one of the other three HVAC Test.
HVAC Test - Journeyman Practice Exam Test 1 of 4
HVAC Test - Journeyman Practice Exam Test 2 of 4
HVAC Test - Journeyman Practice Exam Test 3 of 4
HVAC Test - Journeyman Practice Exam Test 4 of 4 << The page you are on now.
Published:
